
So, there are lots and lots of information on how to install WordPress on a PC, VM etc. The post will be two part series, which target audience is not those folks who want to just install WP on their machine, but those, who want to make an offline copy of their already published online site.
The first part (you are reading it now), just for convenience and completeness, will be your classic how to install WordPress. The second part will be the most interesting, as it will walk you through on how to actually make an offline copy of your website. In other words, make you own development environment, where you can test out new features, or just see what the newest theme update breaks on you site.
Table of contents
- Install Oracle Virtual Box (or use any pc, server to host a VM)
- Create VM and install Ubuntu server
- Change VM settings
- Install Webmin for easier file management
- Setup Ubuntu networking
- Install Apache and needed dependencies
- Download and un’tar WordPress
- Configuring Apache
- Create a database
- WordPress installation and configuration
- Configure PHP
- Summary
Install Oracle Virtual Box (or use any pc, server to host a VM)
In this tutorial I am going to use a Windows 10 host machine with installed Oracle’s Virtual Box software. Of course, there are other solutions that you could use: a dedicated server or a pc, a VM on a server, a VM on a PC (this case)… But this post will not cover those all cases, just the only one.
The proposed solution should be convenient whether you will develop WordPress site at the office/home or on the go.
So, the first step is to download and install the Virtual Box software from the official page.
The installation process should be straight forward, just install it with default selections. The second reason, why I won’t add in-depth installation instructions, because I have just forgot to make notes/pics on how it is done 😀
Create VM and install Ubuntu server
When you have installed Virtual Box, next step is to create a VM (Virtual Machine), where the Linux OS will be installed (and in the end – WordPress).
It is a good idea to download ISO file which contains Linux distribution. I have chosen Ubuntu server distro which can be downloaded from the official website.
You could also use Ubuntu Desktop version – it might be a bit easier to edit files with a graphical file editor. In any case, I will install a web management interface, so it really doesn’t matter whether you will use Desktop or Server version. The Server version requires less PC resources than the Desktop, so keep it in mind.
VM creation
Open Virtual Box software and create new Virtual Machine:

Then, name your VM and choose the OS type:

Next step is to choose, how much of RAM memory you want to dedicate to your VM. I have chosen 2GB, for server it might be a bit too much, for Desktop version I would choose 2-4 GB.

After that, choose to create virtual HDD now:

In the next window select VDI:

After that you will have to choose if you want to make the HDD dynamically allocated or not. I have chosen dynamic HDD, so it would take less space on the host machine:

Then choose what size you want your HDD to be. I have selected 20GB. Because I previously selected HDD to be dynamic, it won’t take 20 GB initially. It will take only the needed space for real data:

Press create button, and you should see your VM in the list:

Ubuntu installation in the VM
Double click on the Virtual Machine or select it and press Start button.
You will be asked to choose the media:

In the new window press Add button and select downloaded Ubuntu ISO file:

When you have ISO selected press Start and installation setup begins.
During the installation setup you will have to choose some settings (like language, network, HDD settings). Most of them I have left in default selection.
One of the installation steps is to create a new user:

There you will create a sudo user – you will have to remember that username and password, because it will be used in the next steps.
Next window will let you choose what additional soft you want to install – I haven’t chosen anything:
After all selections, the installation will begin. After Ubuntu is installed you will have to reboot the Virtual Machine.
Finally, when the machine restarts, login with the user which was created during installation and run commands:
sudo apt-get update
sudo apt-get upgrade
These will update Linux with new updates.
Change VM settings
For this tutorial one of the mandatory things to do is to add an additional network interface. The idea behind it is to have one network interface (IP obtained via DHCP) for Ubuntu, WordPress and its dependencies updates, while other (static IP) interface will be host-only, used to open WordPress site from the Host’s internet browser. Such solution is chosen, so the WordPress site could have a static IP to which you could always connect to, even if you are not connected to the internet.
Set up network interfaces
So, click on the Tools tab and you should be able to see the default Host-Only adapters:

In the picture above, you can see that there is Adapter #4 with DHCP disabled. If you don’t have one, then you will have to create new with the settings seen above.
Then, click on VM tab and press settings button. The Settings window will open. There, choose network tab:

The Adapter 1 should be left default – NAT. This means that the virtual machine will connect to the internet (if available), but you won’t be able to connect to the VM through this connection from the outside of the VM.
Click on the Adapter 2 tab. Here, choose Host-only adapter #4 (the one that does not use DHCP to obtain IP address):

Adapter 2 will have static IP. Because it is Host-only, you will be able to connect to the VM through this connection from Host machine’s web browser, but this connection won’t have access to the internet.
Note, that with these settings, WordPress site will be only available to the Host PC. You will not be able to access WordPress via other devices connected to the same LAN. For this to happen, you could set Adapter 2 to Bridged adapter, but in this case it will probably get dynamic IP, which will have problems as WordPress needs static IP (or at least such IP which does not change). So, you will have to configure your router which will assign the same dynamic IP or a static one to your VM.
Set up CPU count (optional)
For a better VM’s performance you can increase CPU count available to the VM. Go to Vm’s settings -> System -> Processor. I have set it to 2:

Install Webmin for easier file management
Because the Ubuntu server has only command line interface (CLI), at times, it might be difficult to work with it, especially if you need to move, delete, edit lots of files. There are many different web interfaces used to manage servers. One of them is Webmin. I will be using it, not because it is better than others, but just because historically I started using it as my first web GUI.
The whole installation process is based on the official instructions.
Start (if it is shutdown) the VM, log in with your user.
Then, download the Webmin package:
wget http://prdownloads.sourceforge.net/webadmin/webmin_1.981_all.debYou can try installing the downloaded package with a command:
sudo dpkg --install webmin_1.981_all.debIf it runs without problems – good, you are done with the installation, but probably it will complain about missing dependencies. So, install them with a command:
sudo apt-get install perl libnet-ssleay-perl openssl libauthen-pam-perl libpam-runtime libio-pty-perl apt-show-versions python unzipThen, Ubuntu might complain about unmet dependencies. It will suggest the command which fixes things:
apt --fix-broken installAfter this command, everything will install as needed.
When installed, at this point you won’t be able to access the Webmin interface, because we still have not configured the static network, which will be done in the next step.
Setup Ubuntu networking
When VM is running, you can try a command:
ifconfigIt will show interfaces with status ‘up’. You should see two interfaces: loopback and one of the ethernet connections (in my case it was named ‘enp0s3’). You will not see the third interface which is the static one. By default it will be ‘down’.
If ifconfig command does not work, install it via command:
sudo apt install net-toolsYou will need to find out what is the name of the third interface. You can do that with a command:
ip aThe third interface will be in ‘down’ state. In my case it was named ‘enp0s8‘. So, we need to edit a network configuration file to include this interface with a static IP. More about information on Ubuntu network configuration can be found at official page.
Go to neplan directory:
cd /etc/netplan
ll
You should be able to see a .yaml file. In my case it was named: ‘00-installer-config.yaml‘
If you type in a command:
cat 00-installer-config.yamlYou should be able to see a similar output:
network:
  ethernets:
    enp0s3:
      dhcp4: true

  version: 2
As you can see it contain ‘enp0s3‘ interface which is set to obtain IP via DHCP. Edit the file (I have used vim) and add some lines like it is shown below:
network:
  ethernets:
    enp0s3:
      dhcp4: true
    enp0s8:
      addresses:
        - 192.168.200.2/24
  version: 2
Save the file.
So, as you can see, that ‘enp0s8‘ is going to have a static IP of 192.168.200.2
Reboot the VM. Now from the Host PC’s Internet Browser go to https://192.168.200.2:10000 and you should be able to get into Webmin’s log-in screen (Google Chore might warn you that the site is ‘not safe’, just continue into the site).

You can login using username and password that you use to log in into Ubuntu VM.
Install Apache and needed dependencies
At last, we can start installing packages needed for WordPress. This part will be based on a good WordPress installation tutorial.
sudo apt update
sudo apt install apache2 ghostscript libapache2-mod-php \
                 mysql-server php php-bcmath php-curl \
                 php-imagick php-intl php-json \
                 php-mbstring php-mysql php-xml php-zip
For easier copy-pasting of these commands, you can use terminal emulator ![]()
![]() found in Webmin interface.
found in Webmin interface.
Download and un’tar WordPress
Create new directory (for the sake of this tutorial, I have created totally new /srv/www folders, but if you would like to use the default /var/www, you probably have it already on your server – there is no difference where the wordpress files will be located inside your server):
sudo mkdir -p /srv/wwwThen change its owner:
sudo chown www-data: /srv/wwwGo to created folder:
cd /srv/wwwDownload WordPress:
wget https://wordpress.org/latest.tar.gzThen extract downloaded package:
tar -xzvf latest.tar.gzChange ownership again:
sudo chown -R www-data:www-data /srv/wwwConfiguring Apache
Now, via Webmin interface go to ‘/etc/apache2/sites-available‘ folder. You can do that by logging-in into Webmin and selecting Tools-> File Manager -> select folder.
There you should be able to see a default configuration file named ‘000-default.conf‘. Make a copy of this file and rename it to ‘wordpress.conf‘.
Now edit the wordpress.conf file and change it to look like it is shown below:
<VirtualHost *:80>
	DocumentRoot /srv/www/wordpress
        <Directory /srv/www/wordpress>
             Options FollowSymLinks
             AllowOverride Limit Options FileInfo
             DirectoryIndex index.php
             Require all granted
        </Directory>
        <Directory /srv/www/wordpress/wp-content>
             Options FollowSymLinks
             Require all granted
        </Directory>

	ErrorLog ${APACHE_LOG_DIR}/error.log
	CustomLog ${APACHE_LOG_DIR}/access.log combined

</VirtualHost>
Save the changes. Then, enable the wordpress site, disable default site and restart Apache:
sudo a2ensite wordpress
sudo a2enmod rewrite
sudo a2dissite 000-default
system reload apache2
Create a database
A WordPress site requires a database to work. So, we need to create one.
These command might not in Webmin terminal, so might write them directly into the VM:
sudo mysql -u root
CREATE DATABASE wordpress;
CREATE USER wordpress@localhost IDENTIFIED BY '<your-password>';
GRANT SELECT,INSERT,UPDATE,DELETE,CREATE,DROP,ALTER
 ON wordpress.*
 TO wordpress@localhost;
FLUSH PRIVILEGES;
quit
Don’t omit semicolons where shown. Instead of <your-password> write and remember your own unique password. With these commands you will have a database named wordpress, a user named wordpress and user’s password which you write instead of <your-password> . Finally, start MySQL:
sudo service mysql startWordPress installation and configuration
Now, go to 192.168.200.2 and you should see WordPress configuration screen:

In another screen you will have to fill in the data from newly created database:

After that, you will have to name the site, create administrator user:

Click install and it’s done. You will be redirected to login screen. If not, go to 192.168.200.2/wp-admin and type in administrator’s username and password.
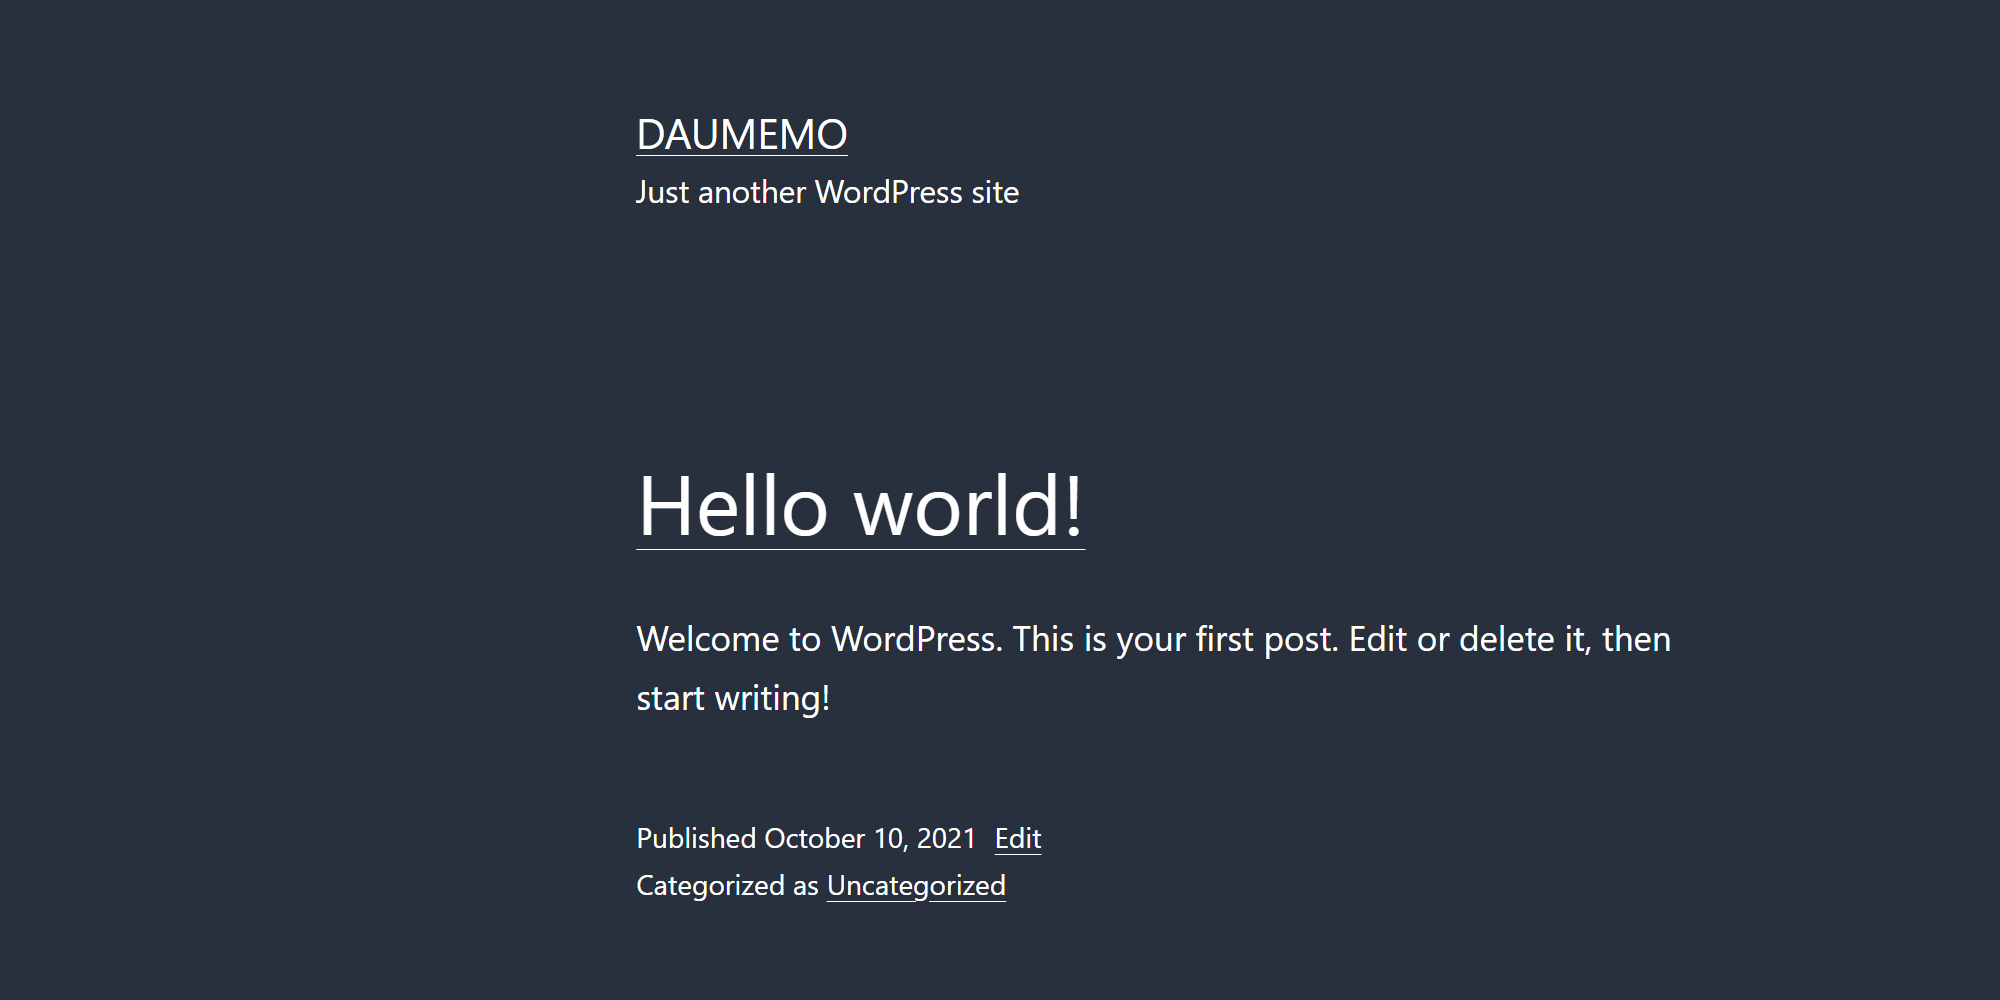
If you go to 192.168.200.2 you will see your sites main page:

Configure PHP
By default you can upload media files to WordPress which are up to 2 MB in size. To change it and some other parameters, you will have to edit (you can do it via Webmin interface’s File Manager) php.ini file which in my case is located in /etc/php/7.4/apache2 directory. You will have to find particular configuration lines and change their values to those shown below:
memory_limit = 256M

post_max_size = 516M

upload_max_filesize = 512M
Save the file. Finally, restart apache service:
sudo service apache2 restartNow, you should be able to upload bigger files to the site.
Summary
That is it. By following this tutorial you should be able to get a working WordPress web site in your Ubuntu VM. From here, you can either use it to create/design your new website or you can read further in the second series part, where you will find out how to copy your current online web site to the VM, so you could test out new features or updates. Do all of that without breaking your online version of the site.
The second part is here: how to copy your online WordPress website into an offline virtual machine.

