A regular camera stand is always handy when you need to shoot still photos. But three-legged stand is not very convenient if you want to make some top-view photos of an object placed on a table. For this reason, I have 3D printed a desk stand.
Part List
- 25mm (~1 inch) outer diameter stainless steel tubing (length depends on your needs)
- 3D printed parts
- 2 pcs 35mm length M4 bolts
- 2 pcs ~85mm length M8 bolts
- 3 pcs M8 nuts
- 4 pcs 20mm length M8 bolts
- 1 pc ~30mm length M8 bolt
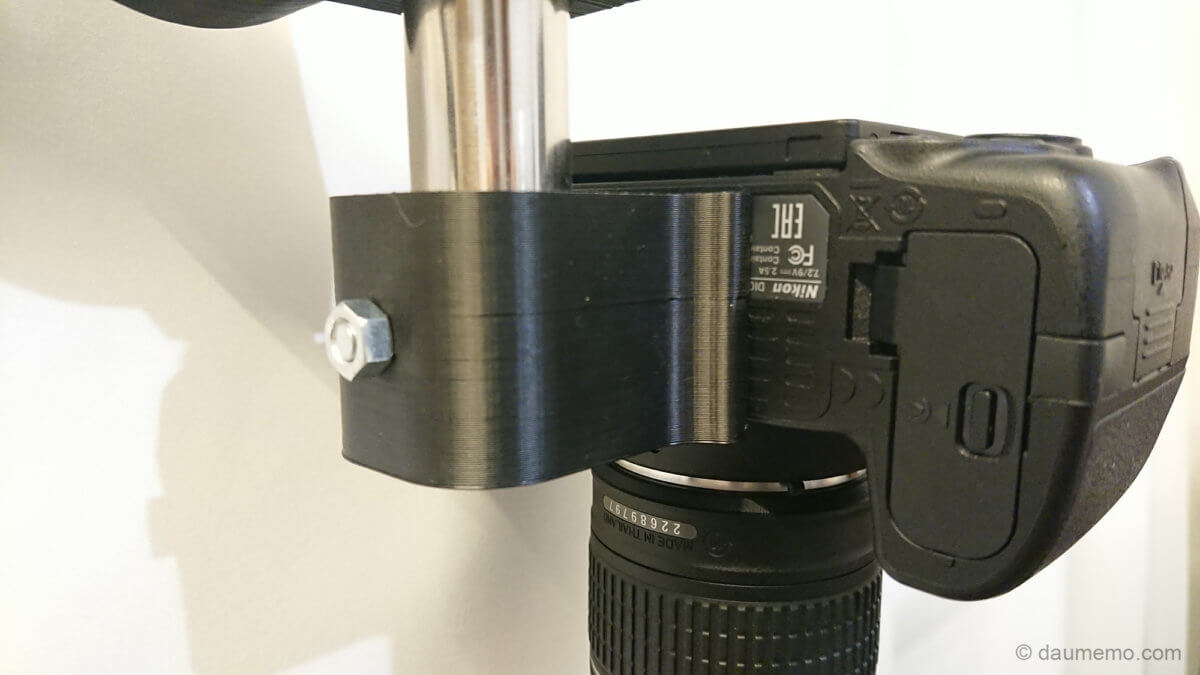
- 1 pc ~65mm length M6 bolt (for the camera)
- Some epoxy or super glue (to glue plastic to a stainless steel)
- Some M8 and M6 washers (it depends on the lengths of the chosen bolts and your preference)
- M8 and M4 threading taps
Construction and assembly
This stand is printed from black ABS plastic (with 0.4mm layer height and 0.6mm nozzle diameter). The tubes are stainless steel with 25mm (~1 inch) outer diameter with length (it can be practically any length) chosen mainly to fit my needs.

After printing the parts, it needed some additional touch up with a knife and file. The parts are designed in such way, that even if it has holes in it the first layer – it is still printed solid. So, after printing, this first layer needs either to be drilled or just cut trough with a knife. This was done to make the printing easier as some parts which have a lot of holes in it could have ended with a failed print. As it is known, the part adhesion to the bed is worse when there is a lot of holes in the part being printed.

There are six (‘MainAngle.stl’ is printed twice) 3D printed parts in total. In some of them you need to make M8 threads. Usually, bolt in those threaded holes are used to keep fixed 25mm stainless steel tubing in place. Also, the three holes in ‘ArmAngleToCamera.stl’ and ‘ArmAngleToDesk.stl’ need to be tapped with an M4 tap. ‘MainAngle.stl’ has a lot of 4mm holes – they are used to lock the stand’s arm in place. The arm can be moved in 5 degrees increments.

Both ‘MainAngle.stl’ parts are glued to the stainless-steel tubing. I have used epoxy to glue it together.

The parts should fit with the tubing snugly, but in my case, I had to sand down insides of some holes to fit the tubing. It might just have shrunk a bit after cooling down. So, you might need to do the same or you can try to print the parts ~0.5% bigger and see what happens.
Finished stand

After putting everything together you will get quite nice stand for your camera. In my opinion, the stand is great for taking vertical photos. Also, even if its construction seems a bit bulky, as it screws onto the desk on the edge and it takes only small amount of desk space.
The stand has one drawback – the bottom ‘MainDeskPart.stl’ 3D printed part is a bit flimsy. Even after tightening down to the table it still tends to bend around a bit. So, the whole construction also flexes around its bottom point. As the stand is still good enough for me, I will use it for some time before redesigning the bottom 3D printed peace.
Links
STL files for printing can be found at the Thingiverse HERE.
Gallery