

This project is mainly oriented to writing a basic WEB user interface for ESP8266. The temperature sensor will be more like an addition to the project instead of being project’s main topic.
You can split ESP based projects into two main types: 1) a device with a battery and 2) a device which is powered from a regular DC power supply. Our WEB interface will be targeted more to the second type of device which operates constantly without any interruptions and can act like a regular web server (where a battery powered device will mostly act as a client who sends data to a server).
How should a basic device work?
If we will think of any server-like ESP project as an end user device, we will notice that first of all, a Wi-Fi enabled device needs some kind of a set-up mechanism (at least for setting up a Wi-Fi connection to your router). At this point there could be several choices of how to connect the device to a router.
Firstly, the device might have a screen and several buttons. In this situation a user will need to input Wi-Fi password and maybe change additional settings trough the screen interface. Secondly, you could use a SD card to set-up the device. After putting in a SD card, the device would read Wi-Fi and other settings from the card. Finally, if your device does not have any of the mentioned means of setting it up (or other ways which I have not thought about), you are left with one and only Wi-Fi connection.
So, lets talk about how quite a lot of IOT devices nowadays are set up by the user. Usually it is done via a Wi-Fi connection. When a device powers up and it cannot find any available Wi-Fi SSID whit a known password, the device starts its own access point (AP). Then, routers credentials are sent via this newly created AP, usually using an additional application for iOS or Android. After that, the device reboots and with newly set up credentials connects to the router.

Our solution
Having own mobile APP for a lot of do-it-yourselvers is quite expensive (money and/or time-wise). So, to make things simpler, the best and simplest solution will be a regular web browser which is always found in a laptop or a smartphone. So, in our case, when the device boots up and it is not able to find any known Wi-Fi SSIDs, it will create its own AP and additionally it will start its own web server. To this server any Wi-Fi enabled device with a browser can connect to. Also, such solution is very cost effective as it only requires an ESP8266 module (which you will use if you are making an ESP based project/device) and a regular smartphone/tablet/laptop with a browser (which you probably have at hand).
A Setup Process
Till now we have decided that we need to handle everything within a web server (while connected with a browser to it). Let’s now decide, what should be done during a simple setup process.
First of all, on a power up, our device turns on its Wi-Fi and checks if there is a network which it can connect to. If it finds a Wi-Fi, then the device connects to a router and just works normally as a web server (more on that later). If it does not find any known Wi-Fi’s, then it starts it’s own Access Point with know to a user credentials. A user can then connect with his/hers smartphone or laptop to this AP as to a regular home router.
Once connected to a newly created AP, user usually needs to browse to a known IP address (like 192.168.4.1) where one will find a web interface to set up the device with text fields such as SSID and Password and a button to “Save”. After pushing “Save” button the device saves credentials to it’s EEPROM (in our case it is written to ESP’s Flash memory) and reboots. After the reboot, the device should connect to saved Wi-Fi and continue with it’s “Normal” operation.
A Direct Control
We know that when our ESP device boots it should connect to known Wi-Fi, if it does not, it needs to create it’s own AP and start a web server for a setup process. But what if you want to control the device by directly connecting to it and not trough a home router? Maybe there is a situation when you don’t have a router nearby, but you still need to have a control of the device?
So, the user needs to have ability to control an ESP device directly. That can be accomplished simply by adding a direct control to the Setup web page. Then the user will have two options: either to type in Wi-Fi credentials and reboot or to press a button “Direct Control” and go to another web-page with controls and/or information that you would get in a “Normal” operation mode.
A Normal operation mode
When the device boots up and it successfully connects to a known Wi-Fi, it starts normal operation: it launches web server and on clients connection it shows default web page with controls and/or information (in this example – relative humidity and temperature readings). Also there should be some kind of way for resetting Wi-Fi credentials (if needed by the user).
A Front-end’s and Back-end’s code
All code can be split into two parts: front-end’s and back-end’s code. When a user connects to a web server a web browser receives one or more files with a web content. Which is then translated to a some kind of a user interface. At this point the server only sends the files and does nothing more. So, front-end code is a code used mainly by the users web browser.
Back-end code is really a firmware written in c or c++ running on an ESP8266. It reads sensor’s data, handles web clients and does all your other regular micro-controller’s stuff.
The Front-end’s code
The best way to write a user side code is to just create some HTML files on your computer which can be opened with any web browser. HTML files usually will include not only HTML code, but also CSS and JavaScript. Although, in normal web pages it is a common practice to keep HTML, CSS and JavaScript in separate files, for this example’s simplicity we will keep everything in one HTML file (a separate HTML file for every web page that our server will have).
Let’s create those HTML files. For simplicity, you can download these files from my GitHub Repository.
Index.html file
Fist of all, we will need a main page, where sensor’s data is shown to a connected web client. Let’s call this file “index.html”. HTML file’s base code could be:
<!DOCTYPE html>
<html>
<head>
<style></style>
</head>

<body>

<script>
</script>
</body>

</html>
This peace of code represents an empty web page. It is a great base for extending it with your own code. I will try to explain some parts of the code, but if you want to read more about HTML, CSS, JavaScript – there is a great web-page (w3schools.com) to do that.
So, you will notice, that most of the code is text between the tags (like <head>, <style>, <div> etc.). There will be three main parts of the code which will be in <style>, <body> or <script> tags. A <style> represents CSS, which defines how some parts of the document looks when a web browser opens it and </style> defines the end of the CSS code. A <body> is a peace of HTML code which is shown to a web client. Inside a <script> tag a JavaScript code is written which defines how the page and it’s parts behave when the user does something (clicks a button etc.). You will notice that there is also a <head> tag which wraps parts of code which are used by a web browser, but is not showed directly to a user.
The header
If you look through “index.html” file, you should notice, that there is something written in file’s <head> section:
<meta charset="UTF-8">
<meta name="viewport" content="width=device-width, initial-scale=1">
The first line specifies the character encoding for the HTML document. Without it there might be problems with incorrect character display (especially in non-English or special characters). The second line makes a web page more usable with mobile devices. Without it the page will be shown zoomed out with tiny text font and icons. That it not usable with small screen devices.
The style
After those lines you can see <style> tag and a lot of CSS inside it. I won’t get into details of every line, but for general understanding I will comment on some of CSS parts. Firstly, you will see block of code with a name (selector) and its declarations defined inside { } brackets. In this example selector is going to be either a class name (which starts with a dot) or a HTML element’s name (without a dot in the beginning, for example: body { } ) or an element’s ID (which starts with ‘#’). Each declaration has some properties with their values defined.
So, for example, ‘.device-card’ class has width, height, position and other attributes defined:
.device-card{
  width: 300px;
  height: auto;
  display: inline-block;
  left: 50%;
  top: 50%;
  position: absolute;
  transform: translate(-50%, -50%);
  margin-bottom: 5px;
}
If you scroll down to the <body> part and look into first <div> element, you will see class=”device-card” attribute which means that this element will look exactly how CSS .device-card code part defines it.
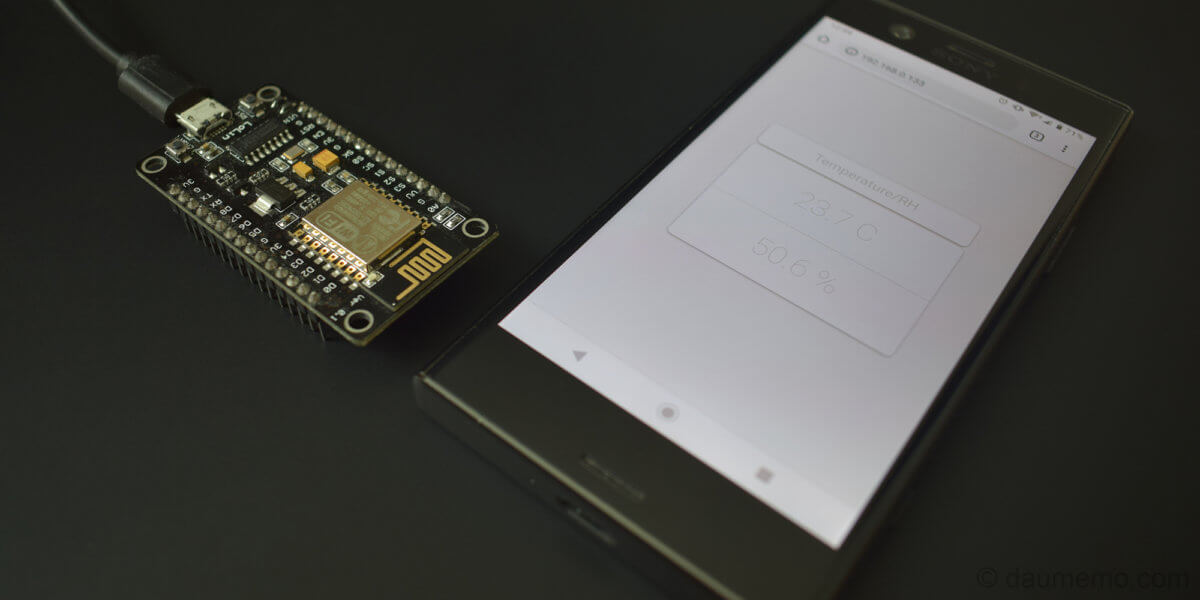
<div class="device-card">
  <div class="device-control-extra">
    <div class="name">Temperature/RH</div>
  </div>
  <div class="device-control-main">
    <div class="temp-text"><div id="temp-value" class="value">0.00 C</div></div>
    <div class="rh-text"><div id="rh-value" class="value">50 %RH</div></div>
  </div>
</div>
Also, you can notice, that this <div> element holds inside several other elements. Logic here is simple – ‘device-card’ element holds every element related to the project/device and puts everything in the middle of the screen (as CSS defines it). An element ‘device-control-extra’ is a small card where the device’s name is written (‘Temperature/RH’ in this case) and an element ‘device-control-main’ holds inside every peace of information that we can get from the sensor (temperature and relative humidity readings).
The script
The last part is a <script> tag. Here JavaScript is located.
var temperature = 0.0;
var relativeHumidity = 0;
var periodicCheck;
First of all, we have some variables. Variable ‘temperature’ holds temperature readings, ‘relativeHumidity’ holds… well, relative humidity readings. Finally, periodicCheck is a representation of an object which periodically receives data from the server.
Function ‘getDataFromServer’ is used to get readings from the server:
function getDataFromServer()
{
  var xmlhttp = new XMLHttpRequest();
  xmlhttp.onreadystatechange = function() {
    if (this.readyState == 4 && this.status == 200) {
    var myObj = JSON.parse(this.responseText);
    temperature = parseFloat(myObj.temp);
    relativeHumidity = parseFloat(myObj.rh);
    updateView();
    }
  };
  xmlhttp.open("GET", "/data");
  xmlhttp.setRequestHeader('Content-type', 'application/x-www-form-urlencoded');
  xmlhttp.send();
}
This function uses XML-Http requests which are run in the background. There is a function which runs when the HTTP request’s status changes (it receives the data). There it is checked, if the status returned is valid. To do that, HTTP request’s ‘readyState’ and ‘status’ properties are checked. In this code ‘this’ means the same XMLHttpRequest object which holds all needed received data from the server (remember that the ‘server’ or ‘backend’ is your ESP firmware code, while all this JavaScript ‘client’ or ‘frontend’ code runs inside your PC browser). After receiving data (which is now held inside ‘responseText‘ property in the JSON format written as plain text) it creates new JSON object (‘myOBJ’) and parses the data into variables ‘temperature’ and ‘relativeHumidity’. Then it updates the view that is shown to the web client (by calling ‘updateView’ function).
Function ‘updateView’ does what it’s name suggests – it takes variable values and inserts it into the HMTL content:
function updateView(){
  document.getElementById("temp-value").innerHTML = temperature + " C";
  document.getElementById("rh-value").innerHTML = relativeHumidity + " %";
}
This function gets HTML elements by their ID’s (“temp-value” or “rh-value”) and then writes newly received values inside them.
When you run function ‘startDataChecks’ it starts periodic data checks from a server:
function startDataChecks(){
  periodicCheck = setInterval(getDataFromServer, 2500);
}
As you might guess, it runs function ‘getDataFromServer’ every 2.5 seconds.
Finally, function ‘stopDataChecks’ stops periodic data checks from the server:
function stopDataChecks(){
  clearInterval(periodicCheck);
}
Final index.html result
I have mentioned earlier that you can find full code at my GitHub Repository . You can also download the file (‘index.html’) and open it with your web browser. You should see something like this:

Additional files
Besides ‘index.html’, there are also some other needed files. File ‘index.html’ is main page which shows basic information (temperature and humidity values). File ‘form.html’ represents a web page shown during device’s setup process. Finally, file ‘reset.html’ is simple file with two links which open either ‘reset.html’ or ‘clear.html’ file. Both ‘reset.html’ and ‘clear.html’ are files with simple text messages for the user and these files don’t do anything else. On the server side there will be some code which runs when the user opens one of those web pages (‘reset.html’ or ‘clear.html’).
The Form
So, from all files, ‘form.html’ has some code which might be interesting to you (becouse other are just simple messages to the user). Let’s skip CSS – as always it just defines how everything looks – and jump to HTML <form> part:
<form action='setting' method='POST'>
  <select id="ssid_select" name="ssid_select" class="inputs" required="required" onchange="checkSSID(this.value)">
    <option value selected disabled>Select SSID</option>
    <option value="insert_custom_ssid" style="color: rgb(255, 210, 126);">Custom SSID</option>
  </select>
  <input id="ssid" name='ssid' placeholder='SSID' length=32 class="inputs hidden">
  <input name='pass' placeholder='Password' length=64 class="inputs">
  <input type='submit' value="SAVE" class=submits>
</form>
HTML <form> element is probably the simplest data acquisition method. The user simply types in information into the form fields and when he or she presses ‘submit’ button, all information is sent (POST’ed) to a predefined URL. This URL is defined in action=’setting’ tag which means that all data is sent to the ‘(SERVER IP)/setting’ URL.
The form has several parts. Selection <select> lets the user to select Wi-FI from a list of available SSID’s. Inside the selection element are <option> elements. The first one is default ‘Select SSID’ element which informs the user to select SSID. The second <option> ‘CustomSSID’ let’s the user to type in custom SSID into particular field. That is a useful feature if you want to set up credentials when a particular Wi-Fi is not available at the moment. More <option> tags are added when program runs particular JavaScript function (more about it later).
The element <input name='pass' placeholder='Password' length=64 class="inputs"> is used to type in Wi-Fi’s password. The element <input type='submit' value="SAVE" class=submits> is actually a submit button. When you press it, all data is sent to the ESP8266 server.
The form’s script
At the end, we reach <script> tag. There are only two functions.
Function ‘getDataFromServer’ is similar to ‘index.html’ function with the same name:
function getDataFromServer()
{
  var xmlhttp = new XMLHttpRequest();
  xmlhttp.onreadystatechange = function() {
    if (this.readyState == 4 && this.status == 200) {
      var myObj = JSON.parse(this.responseText);
      for(var i = 0; i< myObj.SSID.length; i++){
         var option = document.createElement("option");
         option.text = myObj.SSID[i] +"(" + myObj.RSSI[i] + ")" + ((myObj.Protected[i] == 0)?" ":"*");
         option.value = myObj.SSID[i];
         document.getElementById("ssid_select").appendChild(option);
      }
    }
  };
  xmlhttp.open("GET", "/wifissids");
  xmlhttp.setRequestHeader('Content-type', 'application/x-www-form-urlencoded');
  xmlhttp.send();
}
Instead of temperature and humidity values, it gets from the server all SSID’s that ESP8266 managed to find. After receiving that data it appends <select> with additional <option> child elements. Every <option> holds an unique Wi-Fi SSID.
The second function ‘checkSSID’ checks whether or not the user has selected ‘Custom SSID’ option. If he/she has selected that option then additional field is displayed for the user to type in the custom SSID.
function checkSSID(name){
  if(name == "insert_custom_ssid"){
    document.getElementById("ssid").classList.remove("hidden");
    document.getElementById("ssid").value = "";
  }
  else {
    document.getElementById("ssid").classList.add("hidden");
    document.getElementById("ssid").value = name;
  }
}
Front-end’s conclusion
And that is it about all the files which are needed to build a simple web interface (user’s side). Every single HTML file can be opened in almost any modern web browser. You will see final view how every page looks like to the device’s users. You can also play around and modify those files (well at least CSS part) and see how the look of a particular page also changes.
Note, that at this stage JavaScript won’t work as we don’t have a running web server inside ESP. But it will change in the second part of this post.
Links
You can find all the files at my GitHub Repository.
The Second Blog Post’s Part: Here.
Gallery


