There are some great cheap oscilloscopes out there. For those who want a solution which will do the job with as little as possible DSO Shell or similar kits are available. Although now there are kits which are truly portable (e.g. with a battery), but I personally have got myself a semi portable device (which needs additional power supply). So I have decided to modify it and make it portable.
My oscilloscope is DSO Shell (DSO150) which can be obtained for around 25 USD (you can buy it on Aliexpress). It is a decent little thing which is good enough to get the job done (at least for me), but it has one issue it uses 9 V auxiliary power supply which was not included (in my case). While I had laying around 9 V power supply, it is not very convenient to use the scope while plugged it in. So, I have decided to make it portable.
Parts needed
Logically, to power this scope from a battery one will need: the battery (Li-Ion or Li-Po), a battery charger module and a boost converter (as the oscilloscope needs 9 V and the battery gives us only about 3.7 V).
Let’s give you exact parts list used in this modification:
- 2000 mAh Li-Po battery (with protection circuit) (link)
- Boost converter module (affiliate link)
- Micro-USB Li-Po/Li-Ion battery charger module (affiliate link)
- DSO150 oscilloscope (affiliate link)
- Some wires

Modifying the scope
So, what it needs to be done to make this scope portable? Firstly, when assembling the scope according to its instructions, one needs to opt out an optional power connector, otherwise there will be not enough space to put inside the battery charger module. Also, rotary encoder needs to be soldered directly to the main oscilloscopes board discarding additional encoders board to make more space inside. To make this change, I have bent encoders pins upwards so it can be soldered to the main board.

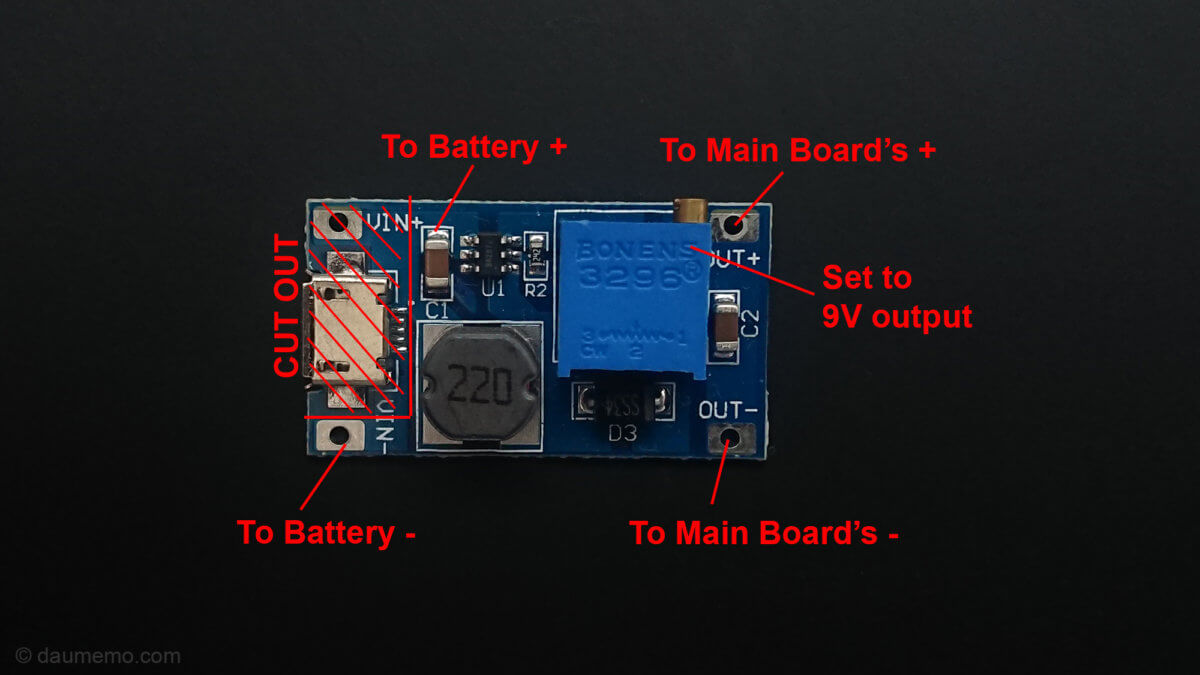
After earlier mentioned modifications which were done during the oscilloscope’s assembly a fun part begins. Fist of all, I have cut down a bit of boost converters module to be able to fit it inside the casing (as you can see in photos). Also, Li-Po battery needed a bit of pin bending to snugly fit it inside the oscilloscope. The battery is held with some double sided tape to the back part of the case. Finally, the micro-USB charger board was glued to oscilloscopes main board with some hot glue. To keep the module isolated from the main board I have put some electrical tape between the main board and the module before gluing them together.


After putting additional electronics and the battery inside the scope, battery charger module has been connected to the battery which has then been connected to the boost converters input pins. Boost converters output goes to oscilloscopes main board.

The Result
So, the end result is a truly a portable little oscilloscope which costs around 35 USD. It takes around 2.5 – 3 hours to charge the battery from standard smartphone charger adapter and the battery lasts for around four hours before needing to charge it again.
There are some drawbacks from this modification. Firstly, the original 9 V DC jack cannot be used anymore, as a power supply connected to it will short out the boost converter (there are no protection diodes between the DC jack and the boost converter). Also, there is no physical indication of what percentage the battery is at. So, you will only know that the battery needs charging when suddenly the oscilloscope’s screen just goes black and you cannot use it anymore.
Despite mentioned drawbacks this oscilloscope is still a great portable device which can be used in any scenarios when you need it for a short period of time.


