There are times when you need to measure temperature with your Arduino board. There are lots of different temperature sensors, most of them reads out data via digital interface. In this post I am going to talk about a simple analog temperature sensor LM35, which reads out temperature as a voltage value.
Table of contents
- The LM35 temperature sensor
- Used hardware in this example
- Arduino and sensor connection
- Writing some code
- Summary
The LM35 temperature sensor
The reason that the LM35 temperature sensor was chosen is its simplicity. The sensor has only 3 pins and is in easy to solder TO-92 case (most popular, there are also other variants). It is also quite cheap alternative to digital sensors.
The sensor is calibrated to show temperature in Celsius. To show the temperature in Fahrenheits, you will have to either convert it from Celsius, or use entirely different sensor. The good thing is that the conversion between different units is easily doable with an MCU.
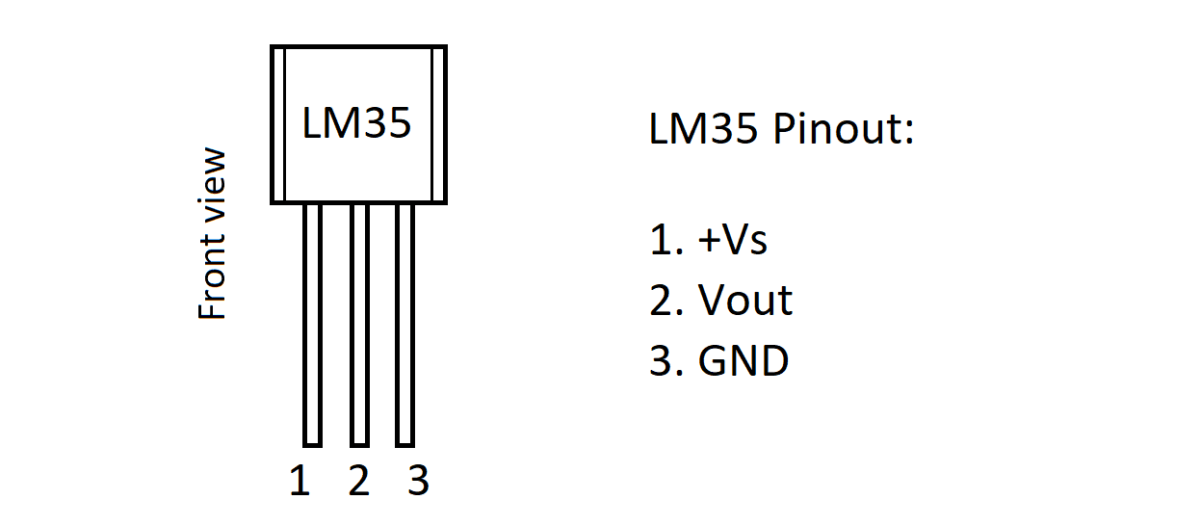
The IC has three pins: +Vs, Vout and GND. +Vs and GND are used to power up the chip. You can use voltages from 4 to 30 V. If you need to measure temperature from 0 to 150 °C only positive voltage is needed, if you also need to measure negative temperatures, you will have to additionally connect negative voltage. How it is done please refer to the IC’s datasheet. Finally, the Vout pins outputs the voltage which corresponds to the measured temperature.
The IC’s pinout (TO-92 package) is shown below:

So, the LM35 measures the temperature which can be read out by Arduino as a voltage value. Each 10 mV represents 1 °C. So, if you measure, for example, 235 mV across output and ground pins, it means that the temperature is 23.5 °C.
Used hardware in this example
- Arduino Nano or equivalent board (Affiliate Aliexpress)
- USB A to Mini USB cable (usually comes with Arduino or can be bought from Aliexpress)
- LM35 temperature sensor (Affiliate Aliexpress)
- Some wires
- Breadboard (optional, if you don’t want to solder parts) (Affiliate Aliexpress)
Arduino and sensor connection
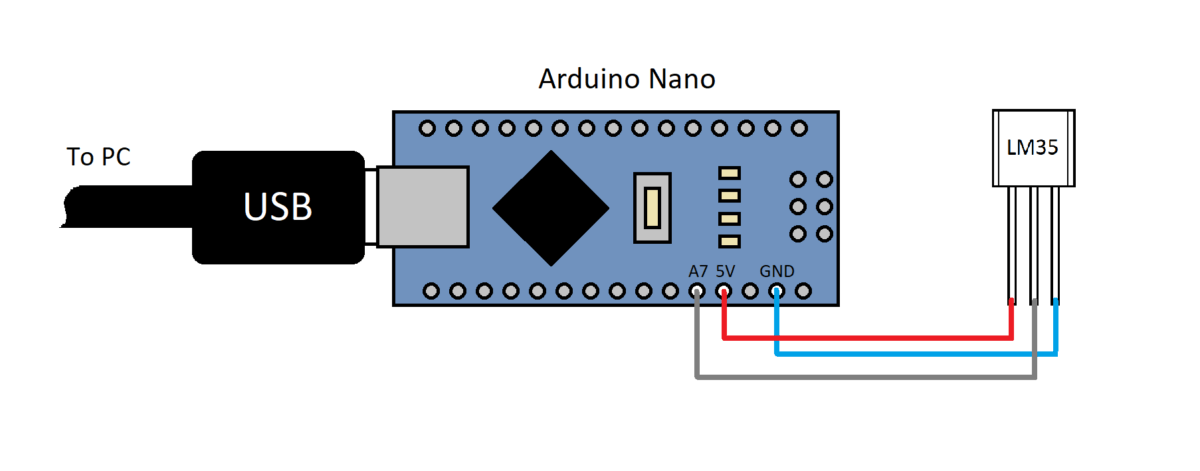
Because most Arduino boards have 5V and GND pins exposed, the sensor can be powered from these pins. The sensor’s Vout pin can be connected to one of available Arduino analog pins. In this tutorial it is going to be A7. Whole connection schematic is shown below:

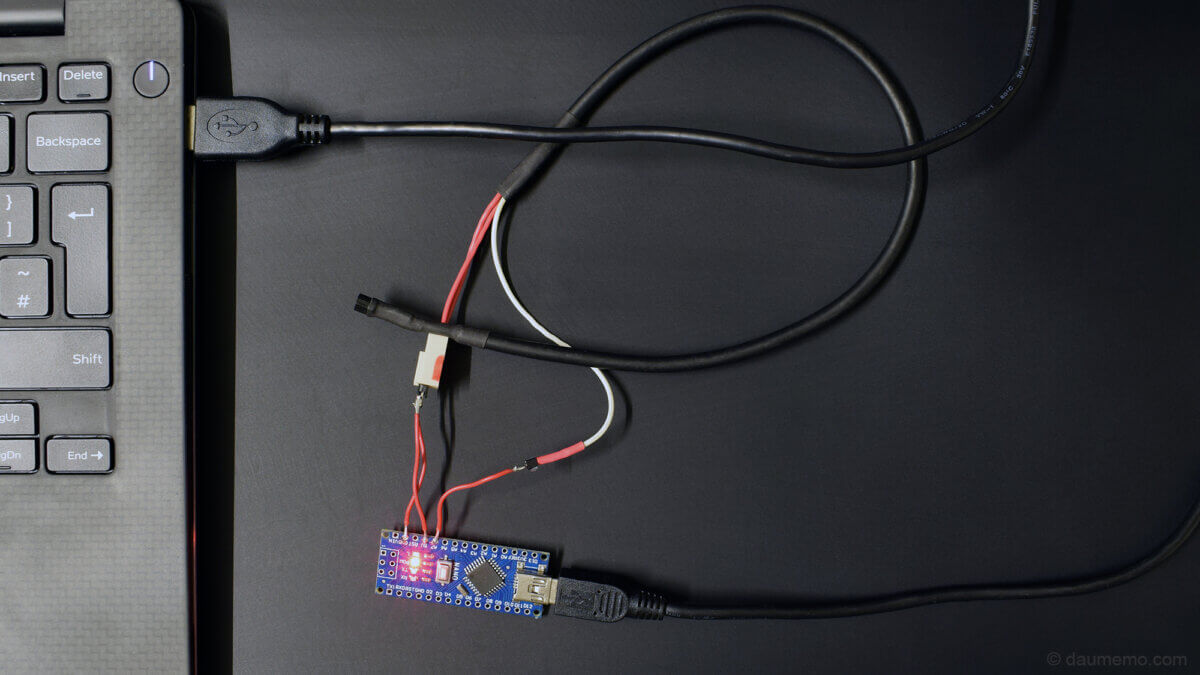
And this is how everything looks in real life:

Although photo does not show how exactly the sensor pins are connected, but, believe me, it is connected in the same manner as it was shown in the connection schematic.
Writing some code
Last thing to do is to write some code which will read voltage from the sensor’s output pin.
I am using PlatformIO IDE which is great tool for programming many MCU’s. I have already talked about how to start using PlatformIO with you Arduino projects.
The code is going to be as simple as possible.
First of all, let’s fill up the setup() function:
void setup() {
  Serial.begin(9600);
  pinMode(A7, INPUT);
  analogReference(INTERNAL);
}
The Serial.begin(9600) line sets up the serial connection to the connected computer with a 9600 kbit/s baud rate. Then, the pinMode(A7, INPUT) tells MCU that we are going to use A7 pin as input. Finally, analogReference(INTERNAL) sets ADC reference voltage to internal source which, in Atmega828p case, is 1.1 V. Other MCU’s can have other voltages.
After that, let’s write some code in the loop():
void loop() {
  delay(1000);
  double temperature = analogRead(A7)*110.0/1023;
  Serial.println(temperature);
}
Firstly, we make one second delay, so the MCU wouldn’t flood the COM port with lots of data. Next, we create double temperature variable which will hold the final temperature value. To get the final value, we need to read ADC input with analogRead(A7) and recalculate it to a temperature value using this formula:
With Arduino Nano, by default ADC resolution is 10 bits. In the setup() function we have already set Vreference to 1.1V. So, with these values, the formula now looks like this:
When we write it in code, we will have the second loop() function line:
double temperature = analogRead(A7)*110.0/1023;Finally, we need somehow transfer this value to a PC. We will do it via COM port with a line:
Serial.println(temperature);So, the all code looks like it is shown below:
#include <Arduino.h>

void setup() {
  Serial.begin(9600);
  pinMode(A7, INPUT);
  analogReference(INTERNAL);
}

void loop() {
  delay(1000);
  double temperature = analogRead(A7)*110.0/1023;
  Serial.println(temperature);
}
Now, click build ![]() , upload
, upload ![]() and open serial monitor
and open serial monitor ![]() . You should be able to see temperature values printed out every second:
. You should be able to see temperature values printed out every second:

Summary
So, you now know how to measure temperature which a cheap LM35 analog sensor with the Arduino board. It is a simple solution which requires only few components (including the USB cable) and several lines of C++ code.


