

Let’s continue building a signal generator and take another step by making a basic web interface. In this context ‘basic’ means a starting point from which interface could be made more advanced with added features, logic, design elements etc.
Note, I started talking about WEB interface, which means that I have almost decided on an MCU to use. It is going to be either ESP32 or ESP8266, which are both Wi-Fi enabled microprocessors and can act as standalone WEB servers. The WEB UI will be based on previous code which was a WEB UI for a temperature sensor. Yet again this device is going to have the same features for connecting it to an access point and/or turning on its own AP. Those WEB pages will probably be copy-pasted, so most important part is index page which will be the main interface used for controlling the generators parameters.
Links to project’s all posts
- VCA822 Gain Amplifier Circuit
- LM7171 Offset Circuit
- Gain and Offset Control Filter Circuit
- Dual 5V Power Supply
- Dual 12V TPS65131 Power Supply
- Battery Charging Circuit with BQ24295
- Basic WEB Interface (this post)
- IPS Capacitive LCD on an ESP32
- IPS LCD, ESP32 with eSPI library and Touch screen
- Final PCB Design for the DIY Waveform Generator
- Custom Design PCBs and How To Get Them Manufactured
- Soldering the PCB
- AD9833 Library and Further Output Noise Reduction
- Arduino BQ24295 Battery Charger Library
- LCD GUI with LVGL on ESP-32
- 3D Printed Enclosure
- Finished DIY generator
The Interface
So, how should look the main control interface? I think that it needs to have some sort of “display” element where important information, such as waveform, frequency, amplitude, offset, etc., is shown. Also, there should be a keyboard which allows user to type in the generator’s parameters.
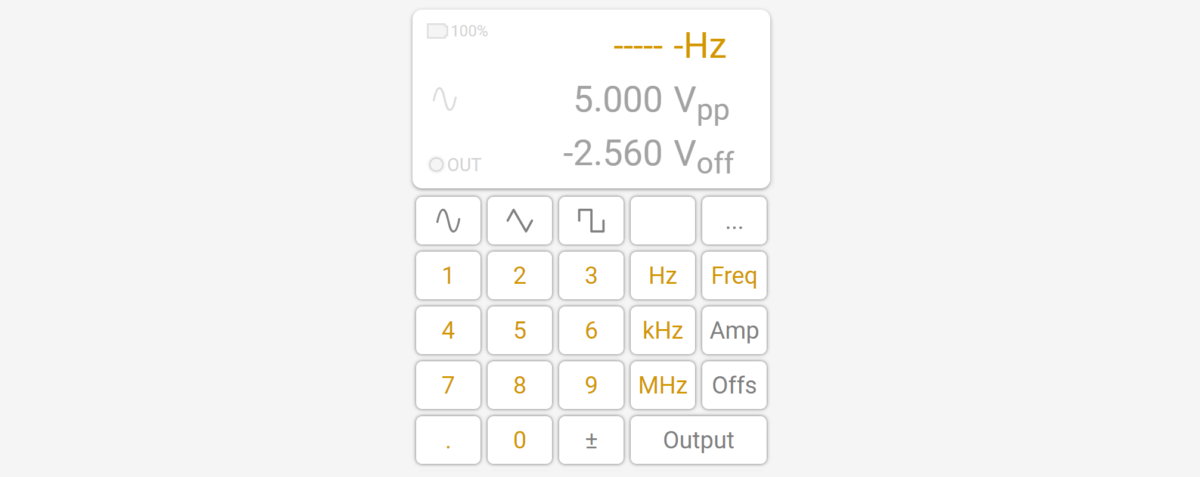
Let’s look on a basic web interface based on those several needs:

You can see almost everything in the image above: the ‘display’ with needed information, and a keyboard for the user inputs.
The keyboard has waveform selection buttons, which will change output waveform between sine, triangle and square waves. There is a num-pad to type in numbers. You can also see a ‘…’ button, which at this point doesn’t have any function, but it could be used as a menu or a ‘second function’ button in the future. Also, a button to the left from ‘…’ is also without any function.
To type in some parameters, you need to press one of the buttons: ‘Freq’, ‘Amp’ or ‘Offs’. Then you are allowed to type in either Frequency, Amplitude or Offset respectively. Furthermore, when you press one of the mentioned buttons, numeric keypad is enabled (its color changes to yellow) and parameter unit keys are shown with units needed for a particular parameter. For example, if you press ‘Freq’, the units are shown: ‘Hz’, ‘kHz’ and ‘MHz’. After typing in a needed number, and pressing one of the unit keys, input is saved and shown in the display. Also, the buttons ‘Freq’, ‘Amp’ or ‘Offs’ works as ‘cancel’ buttons when you are typing in the parameter values. Finally, there is an ‘Output’ button which will turn on/off generator’s output.
To Do
So, that’s it for today’s post. I haven’t mentioned any html/JS code in the post, because at this point the code is a huge mess and it is nowhere finished. Moreover, I might add additional functions such as login screen, ability to save parameters to the internal memory, etc. Also, there isn’t any code responsible for sending data to the generator’s web server and the code lacks some safety check functions, such as checking if typed value is correct and usable. This logic will be implemented in the future.
Finally, it is easy to talk about the interface when I have it at hand, but it might difficult to understand how it works in reality. So I have added working interface (you can play with it) below:

